Member-only story
Ceph FileSystem Basics & Kubernetes
Using Ceph Cluster for Kubernetes: Part 2
Ceph provides three interfaces: block storage, file systems, object storage. In this article, we take a look at the basic use of its file systems. We will proceed in the following order
- Create a ceph file system
- Create a user with Ceph file system permission
- Generate files for file system clients
- Mount the Ceph file system on Linux (Ubuntu)
- Provide a Ceph file system as a backing storage for Kubernetes provisioner
Ceph File System Creation
Now, let’s create a file system in the ceph cluster. Please note that the cluster being used here is described in the previous article.
sudo ceph fs volume create [cephfs name]We created a file system named cephfs-linux.
User Creation
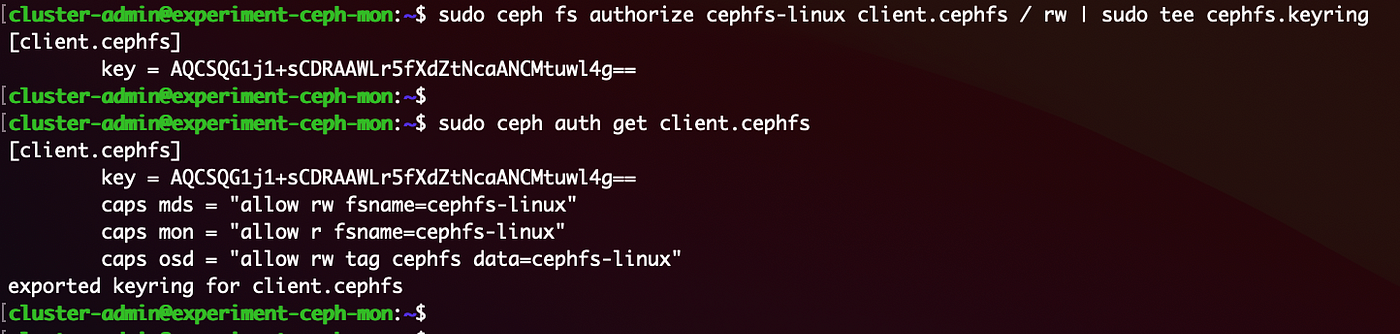
We need a client/user that can access this file system. Let’s create one.
sudo ceph fs authorize [cephfs name] client.[client name] / rwThis will create a new ceph client who can read/write the file system.
Files for Ceph file system users
We need two files to mount ceph file systems on a node. The ceph cluster information and an appropriate user’s keyring. The first one should be captured in ceph.conf. The second one is from the user’s auth. As you can see above, we already create the keyring file. For ceph.conf, use this command.
sudo ceph config generate-minimal-confMount a ceph file system
Now, we are ready to mount the file system that we have created. First, move ceph.conf to /etc/ceph/ceph.conf on a ceph client node. Then, move cephfs.keyring to /etc/ceph/ceph.client.cephfs.keyring on the same ceph client node. Please note that ceph-common needs to be installed as described in a previous tutorial for a rbd mount. The following command will mount the ceph file system.
sudo mount -t ceph :/ /mnt/ceph-fs/ -o name=cephfs